Monday, December 23, 2013
New Year calendar
For this incoming year, here is a English version of a calendar published today by the Italian woodworking forum Legnofilia
Happy New Year!
You can download it here:
2014 calendar
Saturday, November 30, 2013
Not only Stanley Planes
Stanley planes were for sure famous in the world and in their gold era, such a plane really made difference for more than one carpenter and cabinet maker generation. So when the patents expired many plane makers were in the hurry for copying them. Marples and Record in UK, as well as Sargent, Millers Falls, Winchester, Union in US...only looking at most famous. And for imitating Stanley standards, of course was impossible making bad tools.
 Moreover, some tool dealers commit their planes to Stanley. This was the case of Simmons (St. Louis). He since 1866 marked his best made tools "Keen Kutter", a mark kept in use up to '40. I know two Keen Kutter plane series. One has letter K engraved on the plane body and is similar to early Stanley Bedrock planes, the other has engraved letters KK and was like to Sargent planes, and probably made by (I thank Mike Hamilton for giving me more info about Keen Kutter planes).
I had an occasion for have a closer look to a K series plane.
It's a K3 Keen Kutter plane. This plane is of a friend of mine, Ciro, known luthier and skilled user of hand tools. Ciro, knowing my passion for planes, asked me for transforming the K3 in a super smoother , by changing the original blade with a thicker one. In this way he would be able of planing harder and figured woods. A good occasion for taking some pictures.
I can say the K plane is very well made with good finish work. Handles are rosewood and all mechanical parts work precisely.
Knowing Ciro's preferences, I did only a functional recovery, leaving the plane with its lived aspect. The job was easier thank to the very good conditions of this plane.
 The blade is a "Two Cherries" tapered blade, having a 4 mm of thickness at cutting edge, far more than an ordinary Stanley type blade.
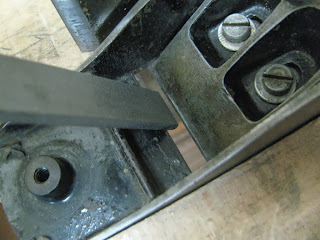
In order to permit to yoke of engaging correctly the chipbreaker hole, I had to elongate its tip by adding sealing material (arc welding) and reshaping.
Sometimes it is necessary to enlarge the plane mouth and/or substitute the chipbreaker screw, but was not the case of this model.
The bed, like Stanley Bedrock planes, slopes toward the mouth; this allows to support the blade at cutting edge in all frog positions and permit the thicker blade insertion without have to file the plane mouth (this was necessary when I had to upgrade Bailey or Record planes).
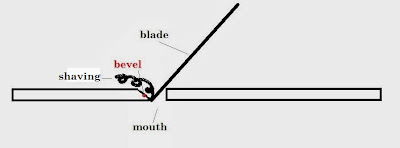
A bevel (red point in the drawing) was filed on the mouth front inner edge. With a very close mouth (0,2-0,3 mm), this allows to create more room to shavings.
I prefer to hone a smoother plane blade straight with rounded corners.
In this case, following Ciro's instructions, I added a 10° back bevel, for having a final cutting angle of 55° (45+10).
The result was fine. The blade thickness and quality make the difference and I hope this first shavings can satisfy my customer.
 Moreover, some tool dealers commit their planes to Stanley. This was the case of Simmons (St. Louis). He since 1866 marked his best made tools "Keen Kutter", a mark kept in use up to '40. I know two Keen Kutter plane series. One has letter K engraved on the plane body and is similar to early Stanley Bedrock planes, the other has engraved letters KK and was like to Sargent planes, and probably made by (I thank Mike Hamilton for giving me more info about Keen Kutter planes).
 I had an occasion for have a closer look to a K series plane.
It's a K3 Keen Kutter plane. This plane is of a friend of mine, Ciro, known luthier and skilled user of hand tools. Ciro, knowing my passion for planes, asked me for transforming the K3 in a super smoother , by changing the original blade with a thicker one. In this way he would be able of planing harder and figured woods. A good occasion for taking some pictures.
I can say the K plane is very well made with good finish work. Handles are rosewood and all mechanical parts work precisely.
Knowing Ciro's preferences, I did only a functional recovery, leaving the plane with its lived aspect. The job was easier thank to the very good conditions of this plane.
 The blade is a "Two Cherries" tapered blade, having a 4 mm of thickness at cutting edge, far more than an ordinary Stanley type blade.
In order to permit to yoke of engaging correctly the chipbreaker hole, I had to elongate its tip by adding sealing material (arc welding) and reshaping.
Sometimes it is necessary to enlarge the plane mouth and/or substitute the chipbreaker screw, but was not the case of this model.
The bed, like Stanley Bedrock planes, slopes toward the mouth; this allows to support the blade at cutting edge in all frog positions and permit the thicker blade insertion without have to file the plane mouth (this was necessary when I had to upgrade Bailey or Record planes).
A bevel (red point in the drawing) was filed on the mouth front inner edge. With a very close mouth (0,2-0,3 mm), this allows to create more room to shavings.
I prefer to hone a smoother plane blade straight with rounded corners.
In this case, following Ciro's instructions, I added a 10° back bevel, for having a final cutting angle of 55° (45+10).
The result was fine. The blade thickness and quality make the difference and I hope this first shavings can satisfy my customer.
Sunday, October 6, 2013
Plane Cabinet

 When I did my workbench I enclosed a shelf for most utilized planes. The shelf became full rapidly and several planes had not a dedicate place.
 The solution was building a new cabinet for hand planes, a good way for keeping them in order and ready to use.
I used the frame and panel technique, with panels inserted in grooves cut in the frame inner edge.
 |
| on the bottom are the long planes boxes |
 | ||
| The loop screw engages a chain for keeping the mobile shelf |
 |
| the cabinet is anchored to the wall for avoid its tipping |
The smaller planes are on a mobile shelf; this rotates, permitting the access to the back.
 |
| Long planes are available after the shelf is tilted forward |
By utilizing recycled wood, we'll have to accept some defects it will show, if we want to avoid of discarding too much wood.
In this case the wood was varnished and exposed to sun (windows) during some decades; this caused tone differences you can see mainly in lateral panels.However this is a shop cabinet and I think some defect is acceptable.
The building details are shown in the video in the previous post.
Wednesday, August 14, 2013
Frame and Panels, a way for building furnitures......
......offering many advantages:
1) Panels are thin and allow to lighten the structure and save wood
2) Frame can be jointed by tenon and mortice, a simple and sturdy way.
3) We can add mouldings and raised fields.
4) Panels are free of moving in the frame following the humidity changes.
But have a close view in the following video:
Saturday, August 10, 2013
Moving Fillister, for rebates and....for making raised panels
The adjustable fence rebate plane is a wooden plane able to compete with its metallic sisters. This model I own, is a moving fillister and comes from UK, made by the planemaker William Kendall (York, 1818-1830).
These planes have a sturdy structure, with side escapement and a skewed blade. The plane has a depth stop, adjustable by a brass thumb screw on the plane top. More, on the left side is also present a nicker, held by a wooden little wedge. Its function is to pre-cut the wood fibers while planing across the grain. On the bottom is the adjustable fence; two big screws stop it at the wished rebate width.
The plane works very well along the grain as well as across the grain. For this reason I use to utilize it for making simple raised panels too.
The first step is to trace the final thickness on all four edges.
This dimension is the same of groove width, minus a quote (1 mm in this case with a 15 mm rebate) for permitting to the panel edge to be inserted correctly into the groove and to move in the case humidity changes were.
The panel is worked across the grain first on both sides.
This trick allows to correct the possible tearout when the plane comes out from the piece.
With the nicker in cutting position trace the internal rebate width by moving the plane backwards for a couple of times. Then set the depth stop and cut the rebate.
In the successive step the plane is inclined on the left side for making the bevel. A ca.10° slope (I cut it by eye) is enough for obtaining the wished effect.
The job finishes when the thickness mark is reached.
A piece of frame is useful for be sure the panel fits correctly in its groove.
Repeat the same steps for longitudinal cuts, without nicker this time.
Some little finishing by a shoulder plane and the panel is ready to be used.
Tuesday, June 25, 2013
A new old home for the Lewin Universal Plane
The Lewin plane was a British tool sold around 50s.
Very close to Stanley 45 and 50, is featured by an aluminium body onto which steel skates are fixed. Another particular feature are the cam bolts; they permit a faster and easier part fixing.
The plane I acquired was in excellent conditions, complete of all cutters and original instruction manual.
The original wooden box (it came with the plane too), instead, came in poor condition.
The plywood bottom was quite irrecoverable as well as the cover was cupped and with its veneers lifted.
The box sides (pine) showed the time signs too, split in more points.
Either the plane than cutters, instead, came in very fair conditions, rust free, due to a thick grease layer I found onto the plane and blades: someone payed particular attention to the precious box content: Thank you!
So, I decided of restoring the box, preserving as well as possible the time signs which give a beautiful lived look.
The first operation was to disassemble parts. The nails were very thin and rusted, so their recovery was quite impossible.
I provided to repair splits and, where necessary, I added pine wood for restoring original dimensions.
Original side joints were pinned rebates but, due to the poor wood condition at extremities, I preferred simple rebate joints. For the purpose I added a little bit of new wood and nails for more strength.
The new bottom was veneered on both sides with a pine veneer on the upper side and a beech one on the bottom side: the original bottom had a similar structure.
The box inside showed some critical points: the cutter box, obtained from a pine block was glued cross-grained to a corner. This probably contributed to the box splitting. So, I preferred to leave it free on the bottom but stopped by two little wood pieces, glued with the grain in the correct orientation. In this way is also possible to remove the cutter holder and keep it on the bench.
The plane holding system is clever and permits of keeping the plane assembled and lifted, so its weight does not act on the bottom.
One holder was substituted end increased in thickness for offering more support to the rods. The instruction manual too has its place in the box, protected now by a plastic bag.
On the external side I refreshed the original colour using a water based dye (a combination of cherry and rosewood dyes); a wax coat completed the box finishing.
A particular was still missed:
Looking at a box short side I noticed a little piece of paper, the remaining of the original label with plane description. A lighter coloured area established its dimensions.
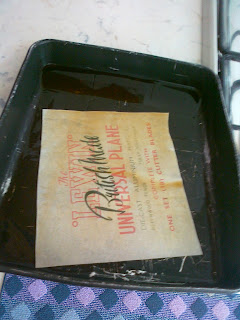
I found a scanner of the label on the net. I printed it and did a colour photostatic copy (my ink jet printer does not produce colours resistant enough for the purpose).
In order to give an antique look, I used a diluted coffee solution in which the paper was soaked for several minutes and a microwave (1 min) for drying it. The final colour was right with some (good) stains due to the fast drying.
The Lewin, is now inside its new old box, ready to work again.
Subscribe to:
Posts (Atom)


