Sunday, November 17, 2019

Making Panels


Subtitles available.
Ciao
Giuliano

Wednesday, November 6, 2019

Planing knots


Subtitles in English available.

Sunday, October 27, 2019

Close the Mouth

Traditionally, the patch has a trapezoidal form
Repair made with wild olive on beech
Wooden planes offer some advantages in respect to metal counterpart. Between these surely are  the minor weight (then minor efforts) and the easier sliding of plane on the piece; moreover the planed surface normally results smoother.   
The darksides are the easier plane body mouvements caused by weather changments and a minor capacity of resist to wear.

The new patch repalces the old one for closing the mouth
When the sole of a wooden plane wears or has changments in its form, it can be quicly re-levelled. Another plane can be used or a plane surface covered with abrasive paper, too.
The cut must be perfectly orthogonal. 
But, every time the sole is levelled, the funnel form of the throat causes an inevitable event: the mouth enlargement. 
Over time by levelling the mouth, it become too much large and, consequently, the plane has a poor performance.  
It is necessary to remedy by a repair: a patch shaped and glued for a proper mouth closing.  


Prepare the recess
Traditionally, a patch of same wood of the sole is used, frequently an harder wood, for provide an higer grade of wear resistance in the zone in front of the blade cutting edge, inserted as well as an inlay, made internally to the plane sides. 

Smooth the head of the board we will use for preparing the insert.
 This approach provides an elegant solution but of not easy realization; moreover if were necessary to intervent again, to make a patch  of a patch could present some troubleshoting. 
In this specific case I just had to intervent on an old repair and I opted for a slightly different approach.


Cut
I saw some japanese video where, as well as the classic patches and other methods based of mobile elements, an insert extending over all sole width were used, easily replaceable in the case of necessity.  

First, prepare a perfect square piece (10x20 mm will be good), cutting it on the head of a board. 
The piece will be oriented so the head fibers will be exposed on the sole for better wear resistence.

After the position on the sole is traced, cut across the grain for 7-8 mm and level the recess bottom by chisel and router plane. The goal is to create a precise recess for inserting the piece so it can be kept firmly in position without gluing.
By using only glue drops, we avoid a definitive gluing up.


Wait several hours
Some glue drops are sufficinet to insure it in place and, if necessary, they will not impede its eventually future remotion for wich will be enough some chisel shot for pull away the insert. 


Ciao Giuliano
After paring, the mouth appears of right dimensions: 0,4-0,5 mm are good for a smoothing plane.


Tuesday, August 27, 2019

My Book on Handplanes

I just published the book "Pialle che Passione", available on Amazon.

I would be glad to provide an English edition, too, but I have not the necessary language skills for writing a book in English. 
However I wanted let you know my work, product of my passion for handplanes. Moreover someone of you around the world could know Italian language and so enjoy fully the read.


This is the presentation video:


Ciao Giuliano


Monday, August 19, 2019

Today’s Plane

It’s longtime I don’t purchase other planes......however I can show you some I restored a while ago. 
It is the case of this jointer plane clearly coming from UK I chose after some years of parking.
It’s the classic 24” beech jointer plane...no maker marks onto the body, except a “2 1/4” at the toe for indicating the iron width. This is a fine example of British plane and has an impressive Marples Shamrock blade and chipbreaker. I use to utilize it for roughing and fast dimernsioning bandsawn pieces.


It remained unused for several years, however no flattening of sole has been required, demonstrating a very stable plane body.

I set it with a substantial cutting depth: the brief video provides an idea of its efficiency.  


Ciao
Giuliano 

Monday, July 29, 2019

Rough Carpentry: Little Garden Fence

It all started when we decided of limiting part of our garden for avoiding access to Johnny.
Who is Johnny? Our incomparable Beagle!


So I thought of installing a wooden fence, 175 cm long, very  simple: two side pieces with a central gate. 


The project is quite simple but I showed its realization for a particular reason: the build was done without nails, screws or glue. 
For me is a new way of working wood. I must say I was satisfied of result: the fence is rock solid and time will tell me if the technical solutions were right.
Stiles and rails are jointed by mortice and tenon and reinforced by pins inserted through the joints; staves fit rails by a dovetail joint.   
For building the fence I used pallet wood (silver fir) without eliminate defects as nail holes, deep scratches or dead knots, all covered by a coulored paint.


Realization of mortices on the stiles.

After preparing pieces by band saw and hand planes I realized the  mortices on the stiles and the housings for insert staves on the rails. 


Trace on both the  head of staves the wished angle.


The first step was to create  the right angle on both edges of staves, with a 1:6 ratio (9,5° circa), as generally prescribed for dovetail joints on soft woods.   


The pencil marks drive for a correct bevel. 
The result. 

With angles traced on both stave heads, I utilized a jack plane for crating the bevel on both edges. 
The next step was to excavate the recesses on rails, realized with saw, chisel and router plane.   


Cut just to the inner side  of waste by a dozuki saw.

Remove the waste.
The router plane levels the bottom of stave recess.

At this point I created a double bevel  on the top of rails, so the rain can slide easily. 


The top edge of rails is bevelled in order to avoid the stagnation of rain water. 

Then realize the tenons, cut slightly wider of final dimensions. A rabbet block plane (Sargent 507) is used for the job. 

The block rebate plane is useful for giving the right dimensions to tenons.  

Because the work is glue free I preferred making tight joints, so that they was held by some mallet shot. The same was for stave insertion, apart the gate joints , held with drawbored pins. 
The holes are flared on top from both parts by a screwdriver of proper size. Pins, properly cut to the extremities, are held from both sides by wedges.   


The tip shape of a screwdriver helps to flare the hole extremities.

Pins show one or two cuts to the extremities for wedge insertion.

When inserted, the pin is held by wedges on both sides.
As said, rail tenons are fixed in their mortices by slightly unmatched holes. Drawboring was applied to fixed part of door lock, placed on one of the stiles: in this case a double mortice was made on the stile and the stop and two floating tenons are drawbored in both pieces.


I haven’t pics of this step, but I drew a sketch for illustrate the concept: 


Drawboring is used to fix the lock stop to the stile.


The fence is assembled in the shop before finishing.


Finish was two coats of cementite and two of  acrylic paint.


Saturday, May 4, 2019

BMW....Ops...VBM 7 Serie


I use to utilize, with ample rotation, all my planes, many of which kept ready to use and sharp.
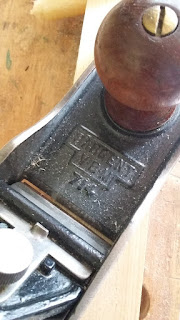
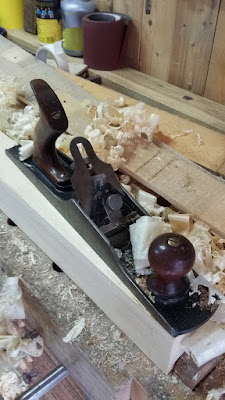
Today was the Sargent VBM 714 (I restored several years ago) workshift. 
VBM stands for Very Best Made
 The 7 serie has the particular feature of having the chipbreaker incorporated into the lever cap and adjustable by a screw, without to have to remove any component.


Moreover, its position remains unchanged, in the case the blade was removed for sharpening. 
Vintage Sargent planes (VBM planes were made in the second decade of XX century) haven't nothing to envy to the best Stanley planes of that period.


Unlike the Stanley ones, the frog is not adjustable, but this don't create particular discomfort in the use of a 714 (n° 5 equivalent). So, in the smoothing planes of the serie (707, 708, 710), the anti-tearout role is provided only by chipbraker and maybe is this the reason for which the mouth is kept rather abundant (at least in the 714 I have; would be interesting to know if this is true for smoothing models too).
Below all models of 7 serie are listed (with approx. lenght):

707, 7"
708, 8"
710, 10"
711, 11"
714, 14"
718, 18"
722, 22"