Sunday, April 17, 2011

If the chipbreaker does not adhere to iron....

Is ......
likely that the thin chip is stopped between the two irons with
resulting
plane mouth clogging. It is therefore necessary to carefully flatten the surface portion  of the chipbreaker that 
adheres to the blade and ensure a perfect fit between the parties. The problem is that sometimes (if not frequently) the chipbreaker is not regular and after the iron screw has been
tight the
blade may show non contact areas, despite having flattened with
care.  Being soft iron, we can try to straighten the chipbreaker in the vice but
this is a little difficult job. 
Another method is to create a burr on the chipbreaker edge, by which we can close any (small) residual gap. The procedure
plans to keep the chipbreaker with an angle respect to a flat surface on which we attack a sheet of 150 grit abrasive paper. Move repeatedly backwards until the metal burr forms. So
use a small screwdriver (electrician models have
the right thin measure) and pass it along the contact line between the two iron until they adhere perfectly.
The process takes few minutes!


Monday, April 11, 2011

Sharpening a Scrub Plane Blade


The  scrub plane blade has an arc-profiled cutting edge, with  more or less  marked radius according to the job required. This profile makes it more difficult to sharpening by guides so many people prefer sharpening it by hand.
I'm not very good at this job, so I searched for sharpening guides available that could serve the purpose. The Record 161 is a guide which is easy to find on ebayUK for few  pounds. It has only one central contact point (a rolling ball in the middle) and this permits to incline to the right and left allowing to follow the cutting edge profile easily.


The  blade is held firmly in place by a clamp screw that allows unrestricted iron orientation, useful even if it was necessary to sharpen skewed blade. The  dark side is that you have to ensure the correct blade position by hand.
For bigger curves the guide can be moved to the sides of the sharpening stone to allow for greater tilt, as seen in the short movie. The result was satisfactory with 35 ° bevel. To re-sharpen exactly to the same  angle I'll use a simple self made jig.

Thursday, April 7, 2011

Scrub Plane

A simple tool for levelling rough boards and other jobs. It is a must in any wood shop.


Monday, April 4, 2011

New Life for a Centenarian Plane


Varvill  & Sons was one of the UK planemaker most active between the late '800 and early '900.

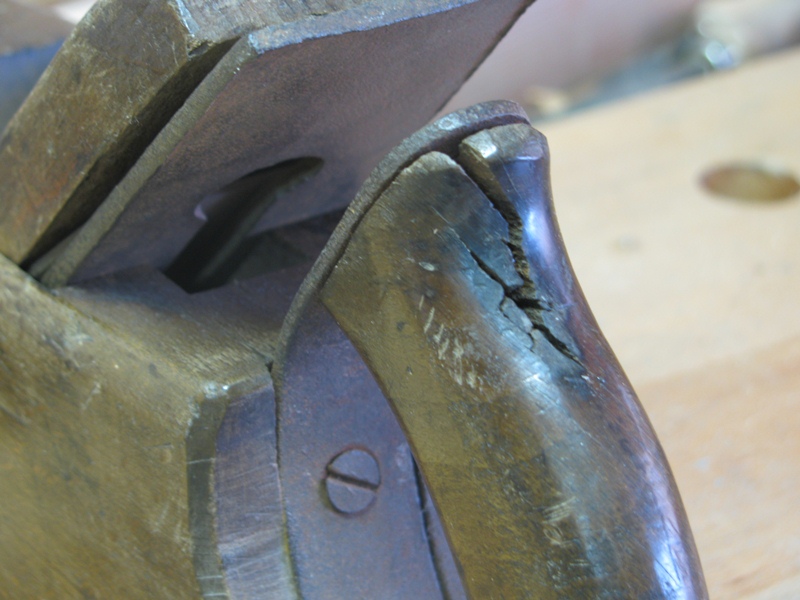
This  smoother plane was built likelihood in the last two decades of the nineteenth century. It has a metal sole and a rear handle, screwed into the back of the body. Hard to say if the metal parts are original or homemade, though some rough details lead more to the latter option. The plane conditions were quite good; this allowed the easy repair and tune up. The beech handle had a break at the top, which occurred where a knot was present. I  removed the broken part and replaced it with a new piece of same wood,  then colored like  to the old beech. The metal sole was slightly bowed in the length, probably due to the wood movement. I removed the screws and smoothed the wood with another plane. After installing the metallic sole, I corrected it on sandpaper attached to a flat surface. Another issue concerned the mouth width. Almost 2 mm, definitely too much for a smoother. I  therefore decided to reduce the opening by inserting a couple of veneer pieces on the seat.  I sharpened the blade with a 30° secondary bevel, flat edge profile, blunt on both sides.

The plane works fine but I have some general concerns regarding its hybrid structure.
The  metal sole is not as great in the smoothness as wood, but is certainly an advantage for two reasons:
1) It adds weight to the plane, useful for cutting with very little iron.
2) The sole resists to the wear and has not need of frequent maintenance.
 The  first point seems irrefutable. For the second one is necessary to say that the presence of the metal sole  prevents natural wood movements and can easily lead to cracks in the plane body, and it is not flexible enough to prevent any warping especially along its length.

If  planing the underlying wood is a solution to restore the flatness, the wooden mouth increases its amplitude and the opening for the chips will be larger. But even if this does not  happens, you have to deal with the tapered blade profile, so  that when it is sharpened it decreases its thickness still leads to a wider mouth. In a full wooden plane a larger mouth is repaired by placing a patch to restore the exact opening width. This is not easily possible with a metallic sole. The repair done with shims placed on the seat can slightly alter  a perfect wedge insertion. Even the handle has advantages and disadvantages. The advantage is a comfortable grip, but at the same time it is an obstacle to beat with a mallet on the plane back when you have to remove the cutting unit.
One is inclined to beat on the handle and perhaps this was the cause of its break.


Wednesday, March 16, 2011

Stanley 75

There are not many positive reviews on this little rabbet plane, even anything! Today I decided to examine it more closely and verify  its performances. Although a simple structure, it has an adjusting mouth. The bullnose structure, with the front part of the sole very narrow, allows the plane for using it in special situations, such as finishing a blind rabbet or working close to the intersection of stiles and rails.
 
The  body plane consists of two sliding parts; a screw allows to lock the parts into position and set the opening  mouth to the desired width. Unfortunately, every time you  perform this operation, you have to reset the blade (troublesome without a blade adjusting wheel),  for which can be certainly convenient to adjust the mouth in an intermediate position  and avoid too many changes. Another weak point is the lever cap; it holds the blade in its position by a thumb screw. It has little contact surface with the blade and it is quite thin and induces apprehension when the screw is tightly closed. The  iron sits at 45°, bevel down, what that preferably addresses this plane for using it with the grain.


The sides were square with the sole.
I run a plane tune up. With the blade in  working position, but retracted so that it cannot cut, I lapped  the sole using glass plate attached sandpaper. The blade was sharpened with a   30° bevel. For this iron type I used the Stanley sharpening guide. In these blades it's very important to obtain the cutting edge perfectly square with the sides. The lever cap was in contact with iron only to one side, making the plane practically unusable. I accurately smoothed this zone and in order to ensure a good contact I had to make a slight correction (I used a file) to the protrusions that form the lever fulcrum. The iron bedded satisfactorily.


The  final result is quite good and the plane proved to be accurate in finishing rabbets. More than one doubt remains, particularly regarding a good blade grip.