Sunday, June 27, 2010

Abrasive paper and double-side tape: together for flattening

Abrasive paper attached to a flat surface is an effective way to flatten the soles of metal planes, significantly improving their performance. I usually use spray adhesive, which provides a strong yet reversible bond, making it easy to replace the abrasive when it's worn out. The only drawback is the glue residue left on the glass plate, which must be cleaned with alcohol each time.

An alternative is to use double-sided adhesive tape. It offers excellent grip, leaves no residue on the glass when removed, and allows for quicker replacement.


If you can't find a full sheet of sandpaper wide enough, you can join two narrower strips together. The tape's thickness is minimal and doesn't affect the level of flatness needed to achieve a well-leveled surface.

Repairing a damaged plane body

Old metal woodworking planes are tools that often span centuries, continuing to bring satisfaction to those who use them even today. When damage occurs accidentally, the person responsible often feels deep guilt for interrupting a century-old life. The only partial consolation is a well-done repair.

The accidental fall of a cast iron plane often causes damage at its weakest point: the sides, near the mouth. This happened to my Stanley #3. After considering various suggestions, I developed a method to repair this type of damage—simple yet effective. By properly clamping the plane body to prevent any movement, we can drill 4 mm holes (slightly larger than the electrodes, which measure about 3.5 mm) along the crack.


At this point, the cast iron is properly heated using a torch or another heat source, and arc welding is performed. I used a small inverter welder with specific electrodes for cast iron. It's actually easier to fill the drilled holes than to weld a concave groove, which requires more experience. (In the photos, I forgot to take a shot immediately after the welding.)
I then proceeded to flatten the sole and sides, which were already almost perfectly aligned. And here it is—restored to its former glory (or almost)—ready to produce its usual thin shavings.


Thursday, May 27, 2010

Old way for frame and panel construction


A traditional method for frame-and-panel construction involves assembling frames using mortise and tenon joints and inserting panels into grooves cut along the perimeter. Success heavily depends on accurate layout and careful adherence to each stage of the process.


To cut the grooves, we choose a plough plane blade that matches the width of the chisel used for the mortises and is appropriate for the panel thickness (1)."


The tenons will be cut on the rails, and consequently, the mortises will be positioned on the stiles. First, establish the length of the stiles and cut them, leaving a few inches at both ends. These spaces (horns) will be useful for safely working during the mortise cutting and will help avoid splitting issues (2).


Use the rails to mark their positions on the stiles, dividing the space according to the scheme shown in the picture (3).


Layout the tenons on the rails using a mortise gauge (4): the distance between their shoulders, plus the width of the stiles, must correspond to the final door width. Use the same mortise gauge to trace the mortises on the stiles.


Cut the mortises and tenon cheeks first (but not the shoulders yet) (5-6), and cut the grooves on the stiles and rails (7-8).


Cut the tenon shoulders and create the haunch (9), with the height of this element equal to the groove depth.


Dry assemble the joints to check fit, then glue them up. Once the glue has dried, cut the horns and insert the door into place (in this case, a frame has been added).


Friday, May 14, 2010

Jointing Fence

Squaring board edges is one of the typical tasks where traditional woodworking hand planes truly show their effectiveness. Stanley produced the famous—but rare—No. 386 fence attachment to be mounted on the side of jointer planes.

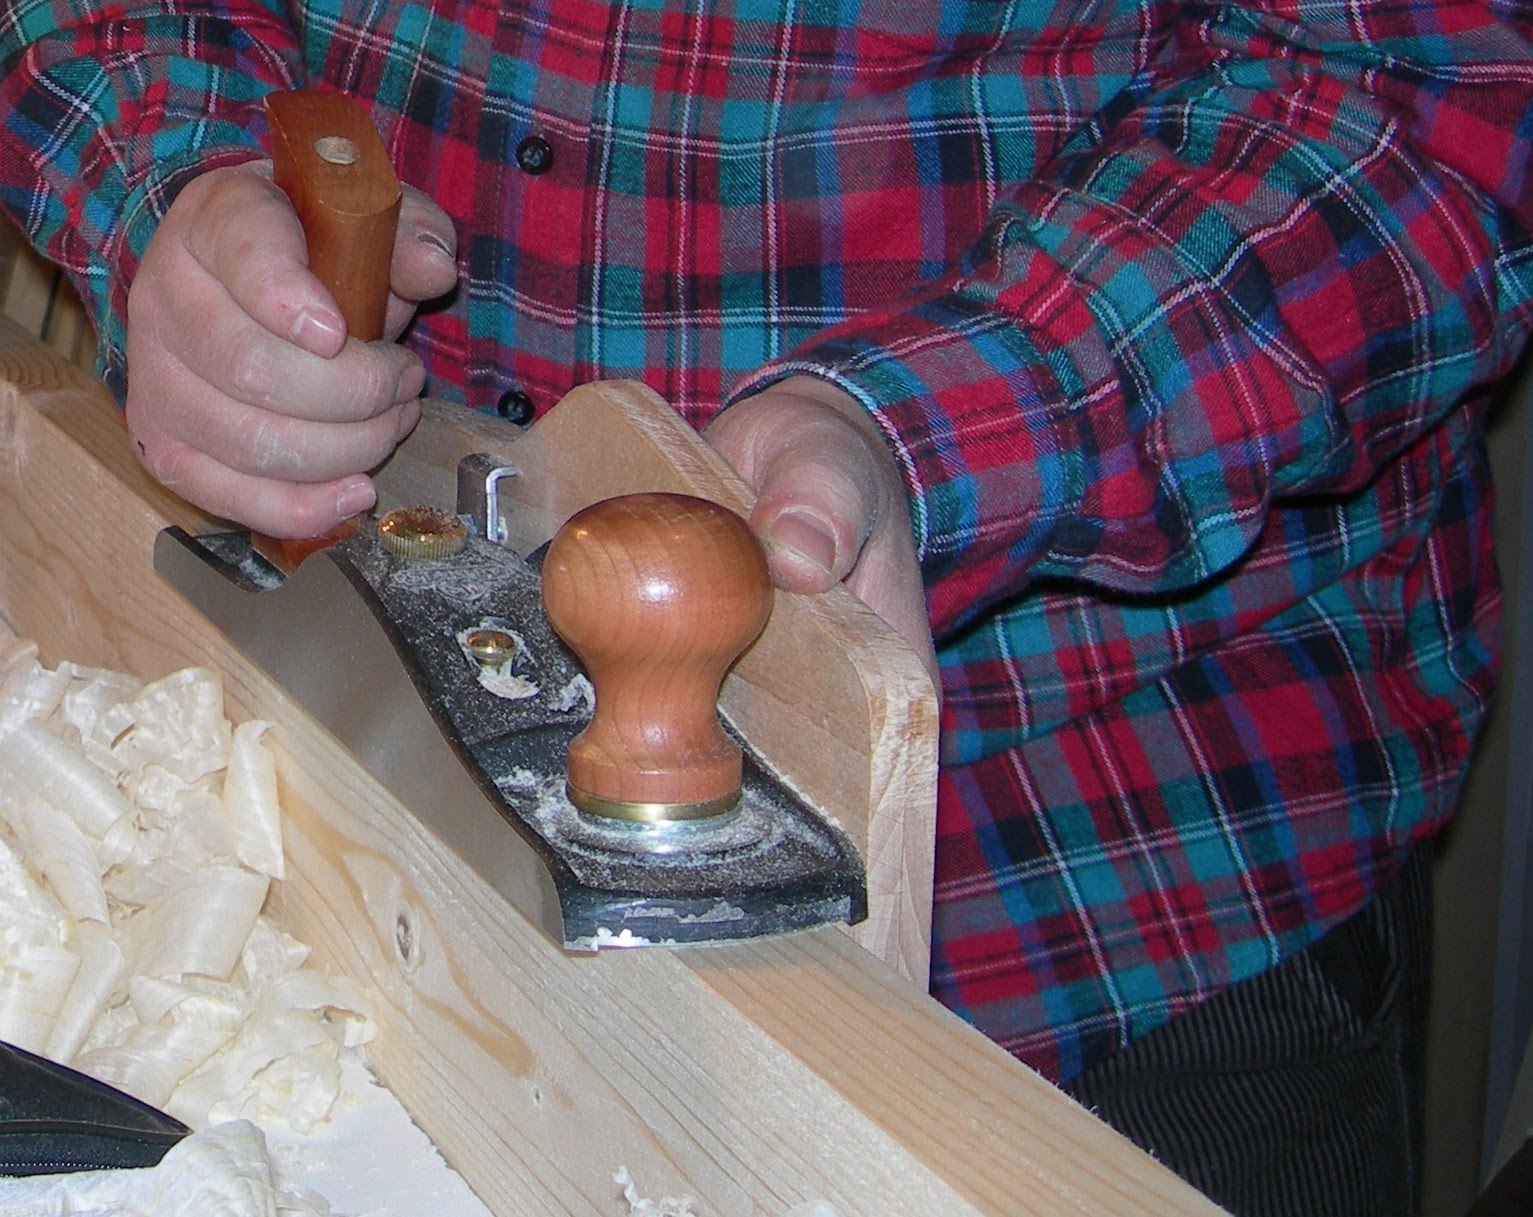
Of course, the best modern plane makers offer similar solutions. I recently needed to square the edges of long fir boards and chose to use the new Stanley No. 62—a low-angle plane with the length of a jack plane, modeled after the historical No. 62. While it’s not a jointer, the low-angle configuration provides advantages when planing softwoods. However, its very low sides don’t allow for attaching traditional guides, so I had to create a custom solution.

I built a simple guide using a beech board, composed of several laminated pieces for greater stability. The top part of the guide is shaped to match the plane, while the bottom extends about 7 cm below the sole.

A second removable piece, attached to the main guide, covers the outer edge near the plane’s mouth. This ensures that when the guide is aligned with the workpiece, it remains within the cutting area. In special cases, this piece can be replaced with a custom-shaped insert to set a different angle from 90°.

The anchoring system consists of two L-plates with a central pivot, forming a very effective third-class lever. Rubber pads between the plates and the plane ensure a secure grip.

During use, lateral pressure holds the fence tightly against the board, maintaining stability and accuracy throughout the cut.


Saturday, May 1, 2010

Sticking Board


When working with small-section pieces using molding, plow, or rebate planes, it can be helpful to use a dedicated planing board to keep the workpiece steady. This setup consists of a leveled board, at least 150 cm long, with a cross-section of about 10 × 2.5 cm. A straight rail (about 4 × 2.5 cm in section) can be glued on top.

It’s important that the side of the rail is square to the surface that supports the workpiece. I added some screws at the end of the board to act as stops during planing. These can be tightened or loosened as needed to prevent the piece from slipping.

If the piece is square, that alone may be sufficient. However, it's often more convenient to work with stock longer than the final dimension, so you can secure it using parts that will later be discarded (as in the cheek of a tenon shown in the photo). Thin nails can be used to hold the piece firmly in place. The board itself is secured using bench dogs and a side vise.