A simple tool for levelling rough boards and other jobs. It is a must in any wood shop.

Thursday, April 7, 2011
Monday, April 4, 2011
New Life for a Centenarian Plane


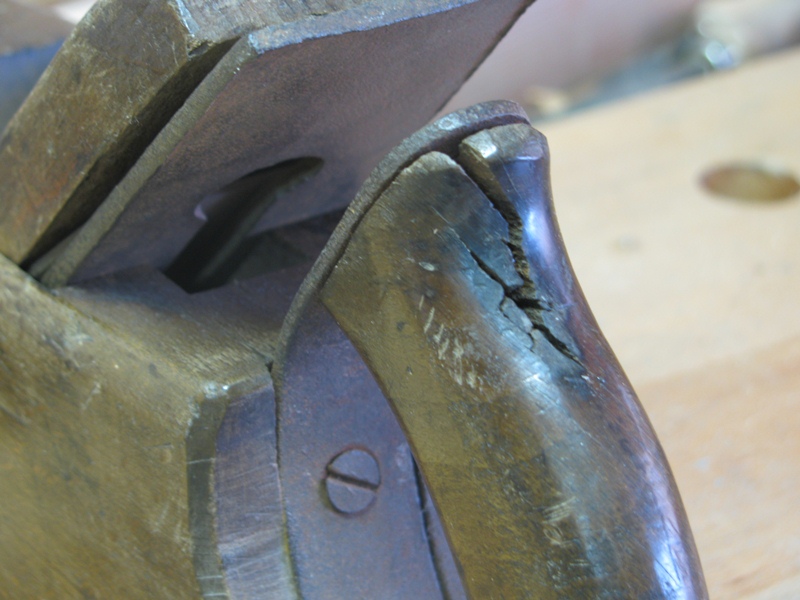
Varvill & Sons was one of the UK planemaker most active between the late '800 and early '900.


This smoother plane was built likelihood in the last two decades of the nineteenth century. It has a metal sole and a rear handle, screwed into the back of the body. Hard to say if the metal parts are original or homemade, though some rough details lead more to the latter option. The plane conditions were quite good; this allowed the easy repair and tune up. The beech handle had a break at the top, which occurred where a knot was present. 
 I removed the broken part and replaced it with a new piece of same wood, then colored like to the old beech. The metal sole was slightly bowed in the length, probably due to the wood movement. I removed the screws and smoothed the wood with another plane. After installing the metallic sole, I corrected it on sandpaper attached to a flat surface. Another issue concerned the mouth width. Almost 2 mm, definitely too much for a smoother. I therefore decided to reduce the opening by inserting a couple of veneer pieces on the seat. I sharpened the blade with a 30° secondary bevel, flat edge profile, blunt on both sides.


 The first point seems irrefutable. For the second one is necessary to say that the presence of the metal sole prevents natural wood movements and can easily lead to cracks in the plane body, and it is not flexible enough to prevent any warping especially along its length.

 I removed the broken part and replaced it with a new piece of same wood, then colored like to the old beech. The metal sole was slightly bowed in the length, probably due to the wood movement. I removed the screws and smoothed the wood with another plane. After installing the metallic sole, I corrected it on sandpaper attached to a flat surface. Another issue concerned the mouth width. Almost 2 mm, definitely too much for a smoother. I therefore decided to reduce the opening by inserting a couple of veneer pieces on the seat. I sharpened the blade with a 30° secondary bevel, flat edge profile, blunt on both sides.

The plane works fine but I have some general concerns regarding its hybrid structure.
The metal sole is not as great in the smoothness as wood, but is certainly an advantage for two reasons:
1) It adds weight to the plane, useful for cutting with very little iron.
2) The sole resists to the wear and has not need of frequent maintenance.
 The first point seems irrefutable. For the second one is necessary to say that the presence of the metal sole prevents natural wood movements and can easily lead to cracks in the plane body, and it is not flexible enough to prevent any warping especially along its length.
 If planing the underlying wood is a solution to restore the flatness, the wooden mouth increases its amplitude and the opening for the chips will be larger. But even if this does not happens, you have to deal with the tapered blade profile, so that when it is sharpened it decreases its thickness still leads to a wider mouth. In a full wooden plane a larger mouth is repaired by placing a patch to restore the exact opening width. This is not easily possible with a metallic sole. The repair done with shims placed on the seat can slightly alter a perfect wedge insertion. Even the handle has advantages and disadvantages. The advantage is a comfortable grip, but at the same time it is an obstacle to beat with a mallet on the plane back when you have to remove the cutting unit.
One is inclined to beat on the handle and perhaps this was the cause of its break.

One is inclined to beat on the handle and perhaps this was the cause of its break.

Wednesday, March 16, 2011
Stanley 75

There are not many positive reviews on this little rabbet plane, even anything! Today I decided to examine it more closely and verify its performances. Although a simple structure, it has an adjusting mouth. The bullnose structure, with the front part of the sole very narrow, allows the plane for using it in special situations, such as finishing a blind rabbet or working close to the intersection of stiles and rails.

 The body plane consists of two sliding parts; a screw allows to lock the parts into position and set the opening mouth to the desired width. Unfortunately, every time you perform this operation, you have to reset the blade (troublesome without a blade adjusting wheel), for which can be certainly convenient to adjust the mouth in an intermediate position and avoid too many changes. Another weak point is the lever cap; it holds the blade in its position by a thumb screw. It has little contact surface with the blade and it is quite thin and induces apprehension when the screw is tightly closed. The iron sits at 45°, bevel down, what that preferably addresses this plane for using it with the grain.

 The sides were square with the sole.
 I run a plane tune up. With the blade in working position, but retracted so that it cannot cut, I lapped the sole using glass plate attached sandpaper. The blade was sharpened with a 30° bevel. For this iron type I used the Stanley sharpening guide. In these blades it's very important to obtain the cutting edge perfectly square with the sides. The lever cap was in contact with iron only to one side, making the plane practically unusable. I accurately smoothed this zone and in order to ensure a good contact I had to make a slight correction (I used a file) to the protrusions that form the lever fulcrum. The iron bedded satisfactorily.

The final result is quite good and the plane proved to be accurate in finishing rabbets. More than one doubt remains, particularly regarding a good blade grip.
Thursday, February 17, 2011
Cutting Board


The cutting board is as simple as useful auxiliary device in any woodworking shop. Its construction is very simple and does not require special materials (scrap wood will be fine)
 The main piece consists of a 1 inch thick board, 10" wide and 1 foot long. At both ends, on opposite sides, two square holders (1 1/4" x 1 1/4" section) are screwed and /or glued (of course these sizes can be customized as needed). While one is located on the backside and firmly holds the tool against the workbench edge, the other is on the top face and holds the workpiece in place during cutting.
 The cutting free hand (in my case the right one, more often the left one) will hold the workpiece firmly pressed against the support. At the same time this force will push the tool against the bench, blocking everything very efficiently.
  Using a free-hand cut, the cutting board, usually, is delegated in the preliminary stages of cutting job, remanding later the fine squaring process, but ......... surfing the net, I saw a Roy Underhill and Chris Schwarz video and..... I discovered a truly amazing trick which helps you to get a much better result. This method exploits the ability of the saw blade to reflect items, including the workpiece. If you look carefully, you will see how the blade may cause image distortion when it is out of square and how easy is, however, to place the saw in the right way just following the optical effect of mirror surface. Well ...... I tried it and really works!
 Here are pictures of the first piece I just cut in this way without marking it. Only one cut dimension (first pic) is slightly out of square.
 The main piece consists of a 1 inch thick board, 10" wide and 1 foot long. At both ends, on opposite sides, two square holders (1 1/4" x 1 1/4" section) are screwed and /or glued (of course these sizes can be customized as needed). While one is located on the backside and firmly holds the tool against the workbench edge, the other is on the top face and holds the workpiece in place during cutting.
This holder is shorter than a couple of inches in respect to the tablet width, in order to provide room to the saw action (typically we will use a backsaw).
 The cutting free hand (in my case the right one, more often the left one) will hold the workpiece firmly pressed against the support. At the same time this force will push the tool against the bench, blocking everything very efficiently.
  Using a free-hand cut, the cutting board, usually, is delegated in the preliminary stages of cutting job, remanding later the fine squaring process, but ......... surfing the net, I saw a Roy Underhill and Chris Schwarz video and..... I discovered a truly amazing trick which helps you to get a much better result. This method exploits the ability of the saw blade to reflect items, including the workpiece. If you look carefully, you will see how the blade may cause image distortion when it is out of square and how easy is, however, to place the saw in the right way just following the optical effect of mirror surface. Well ...... I tried it and really works!
 Here are pictures of the first piece I just cut in this way without marking it. Only one cut dimension (first pic) is slightly out of square.
 Really promising!

Wednesday, February 2, 2011
In small barrel......

....... there is good wine!!


The Stanley 101 is a plane that escapes the attention and consideration of many. It is just long 3 1 / 2 inches and has a blade only 1" wide. It was produced from 1877 to 1962.
When put on the market it was offered as a toy plane, failing to provide the considerable success it would have. In fact, I too have not considered it for some years, parking on its shelf until I had the need to use it. In fact, I had to finish the corners of a frame fixed with glue and nails. Lacking room for using a classic block (my 9 1 / 2 plane) without danger to ruin the cutter edge on nails, I decided to use the 101, which carried out its first job to my service in the best way . Of course it needed the classical basic treatment : iron sharpening (I made a single 30° bevel ) and sole flattening.
I tested the plane onto mahogany and ash. Passed with flying colors!

Subscribe to:
Comments (Atom)